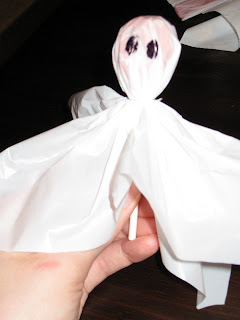
Easy Halloween Craft Idea – Trash Bag Ghosts
The crisp fall weather that’s finally hit Seattle doesn’t just mean that the fall holidays are right around the corner – it also a great excuse to stay inside on the weekends and work on crafts!
This weekend was a quickie for Halloween: Trash bag ghosts! Here are some simple tips for getting your ghostly crew up and running.
Materials Needed:
Kitchen sized trash bag (I was able to make 10 ghosts with just one)
- Scissors
- Needle and thread
- Black sharpie marker
- Something to stuff heads with (In an effort to recycle, I used balled up paper from an old catalog, but cotton balls or even paper towels would also work)
- OPTIONAL: Lollipops
- OPTIONAL: Rubber bands
Steps:
- Cut white trash bag into squares (mine were about 12” sq)
- Ball up old paper or cotton balls and place on center of square
- Pinch the trash bag around the head to form a neck and secure with rubber band or thread (I used thread, which was a little tricky to tie by myself - rubber bands may be easier)
- Use a permanent marker to draw the ghost’s ghoulish face
- Thread a needle
- Pull needle and thread through the top of the poor little ghost’s head
- Tie a small knot to secure the thread and cut the thread to your desired hanging length
- Rinse and repeat :)


I made 10 of these little guys and then hung them outside the house. For about $1.25 worth of supplies, they make quite an impact!
And as another option, you can replace the paper/cotton ball head with a lollipops and skip steps 5-8. These might make cute additions for the kid's lunches or gather them up in a spooky vase for a ghoulish boquet!


2 Comments:
What a great idea!
Love it! I've got to bust out my Halloween decorations this week - fun fun fun :)
Post a Comment
<< Home